sqlite-utils command-line tool#
The sqlite-utils command-line tool can be used to manipulate SQLite databases in a number of different ways.
Once installed the tool should be available as sqlite-utils. It can also be run using python -m sqlite_utils.
Running SQL queries#
The sqlite-utils query command lets you run queries directly against a SQLite database file. This is the default subcommand, so the following two examples work the same way:
sqlite-utils query dogs.db "select * from dogs"
sqlite-utils dogs.db "select * from dogs"
Note
In Python: db.query() CLI reference: sqlite-utils query
Returning JSON#
The default format returned for queries is JSON:
sqlite-utils dogs.db "select * from dogs"
[{"id": 1, "age": 4, "name": "Cleo"},
 {"id": 2, "age": 2, "name": "Pancakes"}]
Newline-delimited JSON#
Use --nl to get back newline-delimited JSON objects:
sqlite-utils dogs.db "select * from dogs" --nl
{"id": 1, "age": 4, "name": "Cleo"}
{"id": 2, "age": 2, "name": "Pancakes"}
JSON arrays#
You can use --arrays to request arrays instead of objects:
sqlite-utils dogs.db "select * from dogs" --arrays
[[1, 4, "Cleo"],
 [2, 2, "Pancakes"]]
You can also combine --arrays and --nl:
sqlite-utils dogs.db "select * from dogs" --arrays --nl
[1, 4, "Cleo"]
[2, 2, "Pancakes"]
If you want to pretty-print the output further, you can pipe it through python -mjson.tool:
sqlite-utils dogs.db "select * from dogs" | python -mjson.tool
[
    {
        "id": 1,
        "age": 4,
        "name": "Cleo"
    },
    {
        "id": 2,
        "age": 2,
        "name": "Pancakes"
    }
]
Binary data in JSON#
Binary strings are not valid JSON, so BLOB columns containing binary data will be returned as a JSON object containing base64 encoded data, that looks like this:
sqlite-utils dogs.db "select name, content from images" | python -mjson.tool
[
    {
        "name": "transparent.gif",
        "content": {
            "$base64": true,
            "encoded": "R0lGODlhAQABAIAAAAAAAP///yH5BAEAAAAALAAAAAABAAEAAAIBRAA7"
        }
    }
]
Nested JSON values#
If one of your columns contains JSON, by default it will be returned as an escaped string:
sqlite-utils dogs.db "select * from dogs" | python -mjson.tool
[
    {
        "id": 1,
        "name": "Cleo",
        "friends": "[{\"name\": \"Pancakes\"}, {\"name\": \"Bailey\"}]"
    }
]
You can use the --json-cols option to automatically detect these JSON columns and output them as nested JSON data:
sqlite-utils dogs.db "select * from dogs" --json-cols | python -mjson.tool
[
    {
        "id": 1,
        "name": "Cleo",
        "friends": [
            {
                "name": "Pancakes"
            },
            {
                "name": "Bailey"
            }
        ]
    }
]
Returning CSV or TSV#
You can use the --csv option to return results as CSV:
sqlite-utils dogs.db "select * from dogs" --csv
id,age,name
1,4,Cleo
2,2,Pancakes
This will default to including the column names as a header row. To exclude the headers, use --no-headers:
sqlite-utils dogs.db "select * from dogs" --csv --no-headers
1,4,Cleo
2,2,Pancakes
Use --tsv instead of --csv to get back tab-separated values:
sqlite-utils dogs.db "select * from dogs" --tsv
id  age     name
1   4       Cleo
2   2       Pancakes
Table-formatted output#
You can use the --table option (or -t shortcut) to output query results as a table:
sqlite-utils dogs.db "select * from dogs" --table
  id    age  name
----  -----  --------
   1      4  Cleo
   2      2  Pancakes
You can use the --fmt option to specify different table formats, for example rst for reStructuredText:
sqlite-utils dogs.db "select * from dogs" --fmt rst
====  =====  ========
  id    age  name
====  =====  ========
   1      4  Cleo
   2      2  Pancakes
====  =====  ========
Available --fmt options are:
asciidocdouble_griddouble_outlinefancy_gridfancy_outlinegithubgridheavy_gridheavy_outlinehtmljiralatexlatex_booktabslatex_longtablelatex_rawmediawikimixed_gridmixed_outlinemoinmoinorgtbloutlinepipeplainprestoprettypsqlrounded_gridrounded_outlinerstsimplesimple_gridsimple_outlinetextiletsvunsafehtmlyoutrack
This list can also be found by running sqlite-utils query --help.
Returning raw data, such as binary content#
If your table contains binary data in a BLOB you can use the --raw option to output specific columns directly to standard out.
For example, to retrieve a binary image from a BLOB column and store it in a file you can use the following:
sqlite-utils photos.db "select contents from photos where id=1" --raw > myphoto.jpg
To return the first column of each result as raw data, separated by newlines, use --raw-lines:
sqlite-utils photos.db "select caption from photos" --raw-lines > captions.txt
Using named parameters#
You can pass named parameters to the query using -p:
sqlite-utils query dogs.db "select :num * :num2" -p num 5 -p num2 6
[{":num * :num2": 30}]
These will be correctly quoted and escaped in the SQL query, providing a safe way to combine other values with SQL.
UPDATE, INSERT and DELETE#
If you execute an UPDATE, INSERT or DELETE query the command will return the number of affected rows:
sqlite-utils dogs.db "update dogs set age = 5 where name = 'Cleo'"
[{"rows_affected": 1}]
Defining custom SQL functions#
You can use the --functions option to pass a block of Python code that defines additional functions which can then be called by your SQL query.
This example defines a function which extracts the domain from a URL:
sqlite-utils query sites.db "select url, domain(url) from urls" --functions '
from urllib.parse import urlparse

def domain(url):
    return urlparse(url).netloc
'
Every callable object defined in the block will be registered as a SQL function with the same name, with the exception of functions with names that begin with an underscore.
SQLite extensions#
You can load SQLite extension modules using the --load-extension option, see Loading SQLite extensions.
sqlite-utils dogs.db "select spatialite_version()" --load-extension=spatialite
[{"spatialite_version()": "4.3.0a"}]
Attaching additional databases#
SQLite supports cross-database SQL queries, which can join data from tables in more than one database file.
You can attach one or more additional databases using the --attach option, providing an alias to use for that database and the path to the SQLite file on disk.
This example attaches the books.db database under the alias books and then runs a query that combines data from that database with the default dogs.db database:
sqlite-utils dogs.db --attach books books.db \
   'select * from sqlite_master union all select * from books.sqlite_master'
Note
In Python: db.attach()
Querying data directly using an in-memory database#
The sqlite-utils memory command works similar to sqlite-utils query, but allows you to execute queries against an in-memory database.
You can also pass this command CSV or JSON files which will be loaded into a temporary in-memory table, allowing you to execute SQL against that data without a separate step to first convert it to SQLite.
Without any extra arguments, this command executes SQL against the in-memory database directly:
sqlite-utils memory 'select sqlite_version()'
[{"sqlite_version()": "3.35.5"}]
It takes all of the same output formatting options as sqlite-utils query: --csv and --csv and --table and --nl:
sqlite-utils memory 'select sqlite_version()' --csv
sqlite_version()
3.35.5
sqlite-utils memory 'select sqlite_version()' --fmt grid
+--------------------+
| sqlite_version()   |
+====================+
| 3.35.5             |
+--------------------+
Running queries directly against CSV or JSON#
If you have data in CSV or JSON format you can load it into an in-memory SQLite database and run queries against it directly in a single command using sqlite-utils memory like this:
sqlite-utils memory data.csv "select * from data"
You can pass multiple files to the command if you want to run joins between data from different files:
sqlite-utils memory one.csv two.json \
  "select * from one join two on one.id = two.other_id"
If your data is JSON it should be the same format supported by the sqlite-utils insert command - so either a single JSON object (treated as a single row) or a list of JSON objects.
CSV data can be comma- or tab- delimited.
The in-memory tables will be named after the files without their extensions. The tool also sets up aliases for those tables (using SQL views) as t1, t2 and so on, or you can use the alias t to refer to the first table:
sqlite-utils memory example.csv "select * from t"
If two files have the same name they will be assigned a numeric suffix:
sqlite-utils memory foo/data.csv bar/data.csv "select * from data_2"
To read from standard input, use either - or stdin as the filename - then use stdin or t or t1 as the table name:
cat example.csv | sqlite-utils memory - "select * from stdin"
Incoming CSV data will be assumed to use utf-8. If your data uses a different character encoding you can specify that with --encoding:
cat example.csv | sqlite-utils memory - "select * from stdin" --encoding=latin-1
If you are joining across multiple CSV files they must all use the same encoding.
Column types will be automatically detected in CSV or TSV data, using the same mechanism as --detect-types described in Inserting CSV or TSV data. You can pass the --no-detect-types option to disable this automatic type detection and treat all CSV and TSV columns as TEXT.
Explicitly specifying the format#
By default, sqlite-utils memory will attempt to detect the incoming data format (JSON, TSV or CSV) automatically.
You can instead specify an explicit format by adding a :csv, :tsv, :json or :nl (for newline-delimited JSON) suffix to the filename. For example:
sqlite-utils memory one.dat:csv two.dat:nl \
  "select * from one union select * from two"
Here the contents of one.dat will be treated as CSV and the contents of two.dat will be treated as newline-delimited JSON.
To explicitly specify the format for data piped into the tool on standard input, use stdin:format - for example:
cat one.dat | sqlite-utils memory stdin:csv "select * from stdin"
Joining in-memory data against existing databases using --attach#
The attach option can be used to attach database files to the in-memory connection, enabling joins between in-memory data loaded from a file and tables in existing SQLite database files. An example:
echo "id\n1\n3\n5" | sqlite-utils memory - --attach trees trees.db \
  "select * from trees.trees where rowid in (select id from stdin)"
Here the --attach trees trees.db option makes the trees.db database available with an alias of trees.
select * from trees.trees where ... can then query the trees table in that database.
The CSV data that was piped into the script is available in the stdin table, so ... where rowid in (select id from stdin) can be used to return rows from the trees table that match IDs that were piped in as CSV content.
--schema, --analyze, --dump and --save#
To see the in-memory database schema that would be used for a file or for multiple files, use --schema:
sqlite-utils memory dogs.csv --schema
CREATE TABLE [dogs] (
    [id] INTEGER,
    [age] INTEGER,
    [name] TEXT
);
CREATE VIEW t1 AS select * from [dogs];
CREATE VIEW t AS select * from [dogs];
You can run the equivalent of the analyze-tables command using --analyze:
sqlite-utils memory dogs.csv --analyze
dogs.id: (1/3)

  Total rows: 2
  Null rows: 0
  Blank rows: 0

  Distinct values: 2

dogs.name: (2/3)

  Total rows: 2
  Null rows: 0
  Blank rows: 0

  Distinct values: 2

dogs.age: (3/3)

  Total rows: 2
  Null rows: 0
  Blank rows: 0

  Distinct values: 2
You can output SQL that will both create the tables and insert the full data used to populate the in-memory database using --dump:
sqlite-utils memory dogs.csv --dump
BEGIN TRANSACTION;
CREATE TABLE [dogs] (
    [id] INTEGER,
    [age] INTEGER,
    [name] TEXT
);
INSERT INTO "dogs" VALUES('1','4','Cleo');
INSERT INTO "dogs" VALUES('2','2','Pancakes');
CREATE VIEW t1 AS select * from [dogs];
CREATE VIEW t AS select * from [dogs];
COMMIT;
Passing --save other.db will instead use that SQL to populate a new database file:
sqlite-utils memory dogs.csv --save dogs.db
These features are mainly intended as debugging tools - for much more finely grained control over how data is inserted into a SQLite database file see Inserting JSON data and Inserting CSV or TSV data.
Returning all rows in a table#
You can return every row in a specified table using the rows command:
sqlite-utils rows dogs.db dogs
[{"id": 1, "age": 4, "name": "Cleo"},
 {"id": 2, "age": 2, "name": "Pancakes"}]
This command accepts the same output options as query - so you can pass --nl, --csv, --tsv, --no-headers, --table and --fmt.
You can use the -c option to specify a subset of columns to return:
sqlite-utils rows dogs.db dogs -c age -c name
[{"age": 4, "name": "Cleo"},
 {"age": 2, "name": "Pancakes"}]
You can filter rows using a where clause with the --where option:
sqlite-utils rows dogs.db dogs -c name --where 'name = "Cleo"'
[{"name": "Cleo"}]
Or pass named parameters using --where in combination with -p:
sqlite-utils rows dogs.db dogs -c name --where 'name = :name' -p name Cleo
[{"name": "Cleo"}]
You can define a sort order using --order column or --order 'column desc'.
Use --limit N to only return the first N rows. Use --offset N to return rows starting from the specified offset.
Note
In Python: table.rows CLI reference: sqlite-utils rows
Listing tables#
You can list the names of tables in a database using the tables command:
sqlite-utils tables mydb.db
[{"table": "dogs"},
 {"table": "cats"},
 {"table": "chickens"}]
You can output this list in CSV using the --csv or --tsv options:
sqlite-utils tables mydb.db --csv --no-headers
dogs
cats
chickens
If you just want to see the FTS4 tables, you can use --fts4 (or --fts5 for FTS5 tables):
sqlite-utils tables docs.db --fts4
[{"table": "docs_fts"}]
Use --counts to include a count of the number of rows in each table:
sqlite-utils tables mydb.db --counts
[{"table": "dogs", "count": 12},
 {"table": "cats", "count": 332},
 {"table": "chickens", "count": 9}]
Use --columns to include a list of columns in each table:
sqlite-utils tables dogs.db --counts --columns
[{"table": "Gosh", "count": 0, "columns": ["c1", "c2", "c3"]},
 {"table": "Gosh2", "count": 0, "columns": ["c1", "c2", "c3"]},
 {"table": "dogs", "count": 2, "columns": ["id", "age", "name"]}]
Use --schema to include the schema of each table:
sqlite-utils tables dogs.db --schema --table
table    schema
-------  -----------------------------------------------
Gosh     CREATE TABLE Gosh (c1 text, c2 text, c3 text)
Gosh2    CREATE TABLE Gosh2 (c1 text, c2 text, c3 text)
dogs     CREATE TABLE [dogs] (
           [id] INTEGER,
           [age] INTEGER,
           [name] TEXT)
The --nl, --csv, --tsv, --table and --fmt options are also available.
Note
In Python: db.tables or db.table_names() CLI reference: sqlite-utils tables
Listing views#
The views command shows any views defined in the database:
sqlite-utils views sf-trees.db --table --counts --columns --schema
view         count  columns               schema
---------  -------  --------------------  --------------------------------------------------------------
demo_view   189144  ['qSpecies']          CREATE VIEW demo_view AS select qSpecies from Street_Tree_List
hello            1  ['sqlite_version()']  CREATE VIEW hello as select sqlite_version()
It takes the same options as the tables command:
--columns--schema--counts--nl--csv--tsv--table
Note
In Python: db.views or db.view_names() CLI reference: sqlite-utils views
Listing indexes#
The indexes command lists any indexes configured for the database:
sqlite-utils indexes covid.db --table
table                             index_name                                                seqno    cid  name                 desc  coll      key
--------------------------------  ------------------------------------------------------  -------  -----  -----------------  ------  ------  -----
johns_hopkins_csse_daily_reports  idx_johns_hopkins_csse_daily_reports_combined_key             0     12  combined_key            0  BINARY      1
johns_hopkins_csse_daily_reports  idx_johns_hopkins_csse_daily_reports_country_or_region        0      1  country_or_region       0  BINARY      1
johns_hopkins_csse_daily_reports  idx_johns_hopkins_csse_daily_reports_province_or_state        0      2  province_or_state       0  BINARY      1
johns_hopkins_csse_daily_reports  idx_johns_hopkins_csse_daily_reports_day                      0      0  day                     0  BINARY      1
ny_times_us_counties              idx_ny_times_us_counties_date                                 0      0  date                    1  BINARY      1
ny_times_us_counties              idx_ny_times_us_counties_fips                                 0      3  fips                    0  BINARY      1
ny_times_us_counties              idx_ny_times_us_counties_county                               0      1  county                  0  BINARY      1
ny_times_us_counties              idx_ny_times_us_counties_state                                0      2  state                   0  BINARY      1
It shows indexes across all tables. To see indexes for specific tables, list those after the database:
sqlite-utils indexes covid.db johns_hopkins_csse_daily_reports --table
The command defaults to only showing the columns that are explicitly part of the index. To also include auxiliary columns use the --aux option - these columns will be listed with a key of 0.
The command takes the same format options as the tables and views commands.
Note
In Python: table.indexes CLI reference: sqlite-utils indexes
Listing triggers#
The triggers command shows any triggers configured for the database:
sqlite-utils triggers global-power-plants.db --table
name             table      sql
---------------  ---------  -----------------------------------------------------------------
plants_insert    plants     CREATE TRIGGER [plants_insert] AFTER INSERT ON [plants]
                            BEGIN
                                INSERT OR REPLACE INTO [_counts]
                                VALUES (
                                  'plants',
                                  COALESCE(
                                    (SELECT count FROM [_counts] WHERE [table] = 'plants'),
                                  0
                                  ) + 1
                                );
                            END
It defaults to showing triggers for all tables. To see triggers for one or more specific tables pass their names as arguments:
sqlite-utils triggers global-power-plants.db plants
The command takes the same format options as the tables and views commands.
Note
In Python: table.triggers or db.triggers CLI reference: sqlite-utils triggers
Showing the schema#
The sqlite-utils schema command shows the full SQL schema for the database:
sqlite-utils schema dogs.db
CREATE TABLE "dogs" (
    [id] INTEGER PRIMARY KEY,
    [name] TEXT
);
This will show the schema for every table and index in the database. To view the schema just for a specified subset of tables pass those as additional arguments:
sqlite-utils schema dogs.db dogs chickens
Note
In Python: table.schema or db.schema CLI reference: sqlite-utils schema
Analyzing tables#
When working with a new database it can be useful to get an idea of the shape of the data. The sqlite-utils analyze-tables command inspects specified tables (or all tables) and calculates some useful details about each of the columns in those tables.
To inspect the tags table in the github.db database, run the following:
sqlite-utils analyze-tables github.db tags
tags.repo: (1/3)

  Total rows: 261
  Null rows: 0
  Blank rows: 0

  Distinct values: 14

  Most common:
    88: 107914493
    75: 140912432
    27: 206156866

  Least common:
    1: 209590345
    2: 206649770
    2: 303218369

tags.name: (2/3)

  Total rows: 261
  Null rows: 0
  Blank rows: 0

  Distinct values: 175

  Most common:
    10: 0.2
    9: 0.1
    7: 0.3

  Least common:
    1: 0.1.1
    1: 0.11.1
    1: 0.1a2

tags.sha: (3/3)

  Total rows: 261
  Null rows: 0
  Blank rows: 0

  Distinct values: 261
For each column this tool displays the number of null rows, the number of blank rows (rows that contain an empty string), the number of distinct values and, for columns that are not entirely distinct, the most common and least common values.
If you do not specify any tables every table in the database will be analyzed:
sqlite-utils analyze-tables github.db
If you wish to analyze one or more specific columns, use the -c option:
sqlite-utils analyze-tables github.db tags -c sha
To show more than 10 common values, use --common-limit 20. To skip the most common or least common value analysis, use --no-most or --no-least:
sqlite-utils analyze-tables github.db tags --common-limit 20 --no-least
Saving the analyzed table details#
analyze-tables can take quite a while to run for large database files. You can save the results of the analysis to a database table called _analyze_tables_ using the --save option:
sqlite-utils analyze-tables github.db --save
The _analyze_tables_ table has the following schema:
CREATE TABLE [_analyze_tables_] (
    [table] TEXT,
    [column] TEXT,
    [total_rows] INTEGER,
    [num_null] INTEGER,
    [num_blank] INTEGER,
    [num_distinct] INTEGER,
    [most_common] TEXT,
    [least_common] TEXT,
    PRIMARY KEY ([table], [column])
);
The most_common and least_common columns will contain nested JSON arrays of the most common and least common values that look like this:
[
    ["Del Libertador, Av", 5068],
    ["Alberdi Juan Bautista Av.", 4612],
    ["Directorio Av.", 4552],
    ["Rivadavia, Av", 4532],
    ["Yerbal", 4512],
    ["Cosquín", 4472],
    ["Estado Plurinacional de Bolivia", 4440],
    ["Gordillo Timoteo", 4424],
    ["Montiel", 4360],
    ["Condarco", 4288]
]
Creating an empty database#
You can create a new empty database file using the create-database command:
sqlite-utils create-database empty.db
To enable WAL mode on the newly created database add the --enable-wal option:
sqlite-utils create-database empty.db --enable-wal
To enable SpatiaLite metadata on a newly created database, add the --init-spatialite flag:
sqlite-utils create-database empty.db --init-spatialite
That will look for SpatiaLite in a set of predictable locations. To load it from somewhere else, use the --load-extension option:
sqlite-utils create-database empty.db --init-spatialite --load-extension /path/to/spatialite.so
Inserting JSON data#
If you have data as JSON, you can use sqlite-utils insert tablename to insert it into a database. The table will be created with the correct (automatically detected) columns if it does not already exist.
You can pass in a single JSON object or a list of JSON objects, either as a filename or piped directly to standard-in (by using - as the filename).
Here’s the simplest possible example:
echo '{"name": "Cleo", "age": 4}' | sqlite-utils insert dogs.db dogs -
To specify a column as the primary key, use --pk=column_name.
To create a compound primary key across more than one column, use --pk multiple times.
If you feed it a JSON list it will insert multiple records. For example, if dogs.json looks like this:
[
    {
        "id": 1,
        "name": "Cleo",
        "age": 4
    },
    {
        "id": 2,
        "name": "Pancakes",
        "age": 2
    },
    {
        "id": 3,
        "name": "Toby",
        "age": 6
    }
]
You can import all three records into an automatically created dogs table and set the id column as the primary key like so:
sqlite-utils insert dogs.db dogs dogs.json --pk=id
You can skip inserting any records that have a primary key that already exists using --ignore:
sqlite-utils insert dogs.db dogs dogs.json --ignore
You can delete all the existing rows in the table before inserting the new records using --truncate:
sqlite-utils insert dogs.db dogs dogs.json --truncate
You can add the --analyze option to run ANALYZE against the table after the rows have been inserted.
Inserting binary data#
You can insert binary data into a BLOB column by first encoding it using base64 and then structuring it like this:
[
    {
        "name": "transparent.gif",
        "content": {
            "$base64": true,
            "encoded": "R0lGODlhAQABAIAAAAAAAP///yH5BAEAAAAALAAAAAABAAEAAAIBRAA7"
        }
    }
]
Inserting newline-delimited JSON#
You can also import newline-delimited JSON using the --nl option:
echo '{"id": 1, "name": "Cleo"}
{"id": 2, "name": "Suna"}' | sqlite-utils insert creatures.db creatures - --nl
Newline-delimited JSON consists of full JSON objects separated by newlines.
If you are processing data using jq you can use the jq -c option to output valid newline-delimited JSON.
Since Datasette can export newline-delimited JSON, you can combine the Datasette and sqlite-utils like so:
curl -L "https://latest.datasette.io/fixtures/facetable.json?_shape=array&_nl=on" \
    | sqlite-utils insert nl-demo.db facetable - --pk=id --nl
You can also pipe sqlite-utils together to create a new SQLite database file containing the results of a SQL query against another database:
sqlite-utils sf-trees.db \
    "select TreeID, qAddress, Latitude, Longitude from Street_Tree_List" --nl \
  | sqlite-utils insert saved.db trees - --nl
sqlite-utils saved.db "select * from trees limit 5" --csv
TreeID,qAddress,Latitude,Longitude
141565,501X Baker St,37.7759676911831,-122.441396661871
232565,940 Elizabeth St,37.7517102172731,-122.441498017841
119263,495X Lakeshore Dr,,
207368,920 Kirkham St,37.760210314285,-122.47073935813
188702,1501 Evans Ave,37.7422086702947,-122.387293152263
Flattening nested JSON objects#
sqlite-utils insert and sqlite-utils memory both expect incoming JSON data to consist of an array of JSON objects, where the top-level keys of each object will become columns in the created database table.
If your data is nested you can use the --flatten option to create columns that are derived from the nested data.
Consider this example document, in a file called log.json:
{
    "httpRequest": {
        "latency": "0.112114537s",
        "requestMethod": "GET",
        "requestSize": "534",
        "status": 200
    },
    "insertId": "6111722f000b5b4c4d4071e2",
    "labels": {
        "service": "datasette-io"
    }
}
Inserting this into a table using sqlite-utils insert logs.db logs log.json will create a table with the following schema:
CREATE TABLE [logs] (
   [httpRequest] TEXT,
   [insertId] TEXT,
   [labels] TEXT
);
With the --flatten option columns will be created using topkey_nextkey column names - so running sqlite-utils insert logs.db logs log.json --flatten will create the following schema instead:
CREATE TABLE [logs] (
   [httpRequest_latency] TEXT,
   [httpRequest_requestMethod] TEXT,
   [httpRequest_requestSize] TEXT,
   [httpRequest_status] INTEGER,
   [insertId] TEXT,
   [labels_service] TEXT
);
Inserting CSV or TSV data#
If your data is in CSV format, you can insert it using the --csv option:
sqlite-utils insert dogs.db dogs dogs.csv --csv
For tab-delimited data, use --tsv:
sqlite-utils insert dogs.db dogs dogs.tsv --tsv
Data is expected to be encoded as Unicode UTF-8. If your data is an another character encoding you can specify it using the --encoding option:
sqlite-utils insert dogs.db dogs dogs.tsv --tsv --encoding=latin-1
To stop inserting after a specified number of records - useful for getting a faster preview of a large file - use the --stop-after option:
sqlite-utils insert dogs.db dogs dogs.csv --csv --stop-after=10
A progress bar is displayed when inserting data from a file. You can hide the progress bar using the --silent option.
By default every column inserted from a CSV or TSV file will be of type TEXT. To automatically detect column types - resulting in a mix of TEXT, INTEGER and FLOAT columns, use the --detect-types option (or its shortcut -d).
For example, given a creatures.csv file containing this:
name,age,weight
Cleo,6,45.5
Dori,1,3.5
The following command:
sqlite-utils insert creatures.db creatures creatures.csv --csv --detect-types
Will produce this schema:
sqlite-utils schema creatures.db
CREATE TABLE "creatures" (
   [name] TEXT,
   [age] INTEGER,
   [weight] FLOAT
);
You can set the SQLITE_UTILS_DETECT_TYPES environment variable if you want --detect-types to be the default behavior:
export SQLITE_UTILS_DETECT_TYPES=1
If a CSV or TSV file includes empty cells, like this one:
name,age,weight
Cleo,6,
Dori,,3.5
They will be imported into SQLite as empty string values, "".
To import them as NULL values instead, use the --empty-null option:
sqlite-utils insert creatures.db creatures creatures.csv --csv --empty-null
Alternative delimiters and quote characters#
If your file uses a delimiter other than , or a quote character other than " you can attempt to detect delimiters or you can specify them explicitly.
The --sniff option can be used to attempt to detect the delimiters:
sqlite-utils insert dogs.db dogs dogs.csv --sniff
Alternatively, you can specify them using the --delimiter and --quotechar options.
Here’s a CSV file that uses ; for delimiters and the | symbol for quote characters:
name;description
Cleo;|Very fine; a friendly dog|
Pancakes;A local corgi
You can import that using:
sqlite-utils insert dogs.db dogs dogs.csv --delimiter=";" --quotechar="|"
Passing --delimiter, --quotechar or --sniff implies --csv, so you can omit the --csv option.
CSV files without a header row#
The first row of any CSV or TSV file is expected to contain the names of the columns in that file.
If your file does not include this row, you can use the --no-headers option to specify that the tool should not use that fist row as headers.
If you do this, the table will be created with column names called untitled_1 and untitled_2 and so on. You can then rename them using the sqlite-utils transform ... --rename command, see Transforming tables.
Inserting unstructured data with --lines and --text#
If you have an unstructured file you can insert its contents into a table with a single line column containing each line from the file using --lines. This can be useful if you intend to further analyze those lines using SQL string functions or sqlite-utils convert:
sqlite-utils insert logs.db loglines logfile.log --lines
This will produce the following schema:
CREATE TABLE [loglines] (
   [line] TEXT
);
You can also insert the entire contents of the file into a single column called text using --text:
sqlite-utils insert content.db content file.txt --text
The schema here will be:
CREATE TABLE [content] (
   [text] TEXT
);
Applying conversions while inserting data#
The --convert option can be used to apply a Python conversion function to imported data before it is inserted into the database. It works in a similar way to sqlite-utils convert.
Your Python function will be passed a dictionary called row for each item that is being imported. You can modify that dictionary and return it - or return a fresh dictionary - to change the data that will be inserted.
Given a JSON file called dogs.json containing this:
[
    {"id": 1, "name": "Cleo"},
    {"id": 2, "name": "Pancakes"}
]
The following command will insert that data and add an is_good column set to 1 for each dog:
sqlite-utils insert dogs.db dogs dogs.json --convert 'row["is_good"] = 1'
The --convert option also works with the --csv, --tsv and --nl insert options.
As with sqlite-utils convert you can use --import to import additional Python modules, see Importing additional modules for details.
You can also pass code that runs some initialization steps and defines a convert(value) function, see Defining a convert() function.
--convert with --lines#
Things work slightly differently when combined with the --lines or --text options.
With --lines, instead of being passed a row dictionary your function will be passed a line string representing each line of the input. Given a file called access.log containing the following:
INFO:     127.0.0.1:60581 - GET / HTTP/1.1 200 OK
INFO:     127.0.0.1:60581 - GET /foo/-/static/app.css?cead5a HTTP/1.1 200 OK
You could convert it into structured data like so:
sqlite-utils insert logs.db loglines access.log --convert '
type, source, _, verb, path, _, status, _ = line.split()
return {
    "type": type,
    "source": source,
    "verb": verb,
    "path": path,
    "status": status,
}' --lines
The resulting table would look like this:
type |
source |
verb |
path |
status |
|---|---|---|---|---|
INFO: |
127.0.0.1:60581 |
GET |
/ |
200 |
INFO: |
127.0.0.1:60581 |
GET |
/foo/-/static/app.css?cead5a |
200 |
--convert with --text#
With --text the entire input to the command will be made available to the function as a variable called text.
The function can return a single dictionary which will be inserted as a single row, or it can return a list or iterator of dictionaries, each of which will be inserted.
Here’s how to use --convert and --text to insert one record per word in the input:
echo 'A bunch of words' | sqlite-utils insert words.db words - \
    --text --convert '({"word": w} for w in text.split())'
The result looks like this:
sqlite-utils dump words.db
BEGIN TRANSACTION;
CREATE TABLE [words] (
   [word] TEXT
);
INSERT INTO "words" VALUES('A');
INSERT INTO "words" VALUES('bunch');
INSERT INTO "words" VALUES('of');
INSERT INTO "words" VALUES('words');
COMMIT;
Insert-replacing data#
The --replace option to insert causes any existing records with the same primary key to be replaced entirely by the new records.
To replace a dog with in ID of 2 with a new record, run the following:
echo '{"id": 2, "name": "Pancakes", "age": 3}' | \
    sqlite-utils insert dogs.db dogs - --pk=id --replace
Upserting data#
Upserting is update-or-insert. If a row exists with the specified primary key the provided columns will be updated. If no row exists that row will be created.
Unlike insert --replace, an upsert will ignore any column values that exist but are not present in the upsert document.
For example:
echo '{"id": 2, "age": 4}' | \
    sqlite-utils upsert dogs.db dogs - --pk=id
This will update the dog with an ID of 2 to have an age of 4, creating a new record (with a null name) if one does not exist. If a row DOES exist the name will be left as-is.
The command will fail if you reference columns that do not exist on the table. To automatically create missing columns, use the --alter option.
Note
upsert in sqlite-utils 1.x worked like insert ... --replace does in 2.x. See issue #66 for details of this change.
Executing SQL in bulk#
If you have a JSON, newline-delimited JSON, CSV or TSV file you can execute a bulk SQL query using each of the records in that file using the sqlite-utils bulk command.
The command takes the database file, the SQL to be executed and the file containing records to be used when evaluating the SQL query.
The SQL query should include :named parameters that match the keys in the records.
For example, given a chickens.csv CSV file containing the following:
id,name
1,Blue
2,Snowy
3,Azi
4,Lila
5,Suna
6,Cardi
You could insert those rows into a pre-created chickens table like so:
sqlite-utils bulk chickens.db \
  'insert into chickens (id, name) values (:id, :name)' \
  chickens.csv --csv
This command takes the same options as the sqlite-utils insert command - so it defaults to expecting JSON but can accept other formats using --csv or --tsv or --nl or other options described above.
By default all of the SQL queries will be executed in a single transaction. To commit every 20 records, use --batch-size 20.
Inserting data from files#
The insert-files command can be used to insert the content of files, along with their metadata, into a SQLite table.
Here’s an example that inserts all of the GIF files in the current directory into a gifs.db database, placing the file contents in an images table:
sqlite-utils insert-files gifs.db images *.gif
You can also pass one or more directories, in which case every file in those directories will be added recursively:
sqlite-utils insert-files gifs.db images path/to/my-gifs
By default this command will create a table with the following schema:
CREATE TABLE [images] (
    [path] TEXT PRIMARY KEY,
    [content] BLOB,
    [size] INTEGER
);
Content will be treated as binary by default and stored in a BLOB column. You can use the --text option to store that content in a TEXT column instead.
You can customize the schema using one or more -c options. For a table schema that includes just the path, MD5 hash and last modification time of the file, you would use this:
sqlite-utils insert-files gifs.db images *.gif -c path -c md5 -c mtime --pk=path
This will result in the following schema:
CREATE TABLE [images] (
    [path] TEXT PRIMARY KEY,
    [md5] TEXT,
    [mtime] FLOAT
);
Note that there’s no content column here at all - if you specify custom columns using -c you need to include -c content to create that column.
You can change the name of one of these columns using a -c colname:coldef parameter. To rename the mtime column to last_modified you would use this:
sqlite-utils insert-files gifs.db images *.gif \
    -c path -c md5 -c last_modified:mtime --pk=path
You can pass --replace or --upsert to indicate what should happen if you try to insert a file with an existing primary key. Pass --alter to cause any missing columns to be added to the table.
The full list of column definitions you can use is as follows:
nameThe name of the file, e.g.
cleo.jpgpathThe path to the file relative to the root folder, e.g.
pictures/cleo.jpgfullpathThe fully resolved path to the image, e.g.
/home/simonw/pictures/cleo.jpgsha256The SHA256 hash of the file contents
md5The MD5 hash of the file contents
modeThe permission bits of the file, as an integer - you may want to convert this to octal
contentThe binary file contents, which will be stored as a BLOB
content_textThe text file contents, which will be stored as TEXT
mtimeThe modification time of the file, as floating point seconds since the Unix epoch
ctimeThe creation time of the file, as floating point seconds since the Unix epoch
mtime_intThe modification time as an integer rather than a float
ctime_intThe creation time as an integer rather than a float
mtime_isoThe modification time as an ISO timestamp, e.g.
2020-07-27T04:24:06.654246ctime_isoThe creation time is an ISO timestamp
sizeThe integer size of the file in bytes
stemThe filename without the extension - for
file.txt.gzthis would befile.txtsuffixThe file extension - for
file.txt.gzthis would be.gz
You can insert data piped from standard input like this:
cat dog.jpg | sqlite-utils insert-files dogs.db pics - --name=dog.jpg
The - argument indicates data should be read from standard input. The string passed using the --name option will be used for the file name and path values.
When inserting data from standard input only the following column definitions are supported: name, path, content, content_text, sha256, md5 and size.
Converting data in columns#
The convert command can be used to transform the data in a specified column - for example to parse a date string into an ISO timestamp, or to split a string of tags into a JSON array.
The command accepts a database, table, one or more columns and a string of Python code to be executed against the values from those columns. The following example would replace the values in the headline column in the articles table with an upper-case version:
sqlite-utils convert content.db articles headline 'value.upper()'
The Python code is passed as a string. Within that Python code the value variable will be the value of the current column.
The code you provide will be compiled into a function that takes value as a single argument. If you break your function body into multiple lines the last line should be a return statement:
sqlite-utils convert content.db articles headline '
value = str(value)
return value.upper()'
Your code will be automatically wrapped in a function, but you can also define a function called convert(value) which will be called, if available:
sqlite-utils convert content.db articles headline '
def convert(value):
    return value.upper()'
Use a CODE value of - to read from standard input:
cat mycode.py | sqlite-utils convert content.db articles headline -
Where mycode.py contains a fragment of Python code that looks like this:
def convert(value):
    return value.upper()
The conversion will be applied to every row in the specified table. You can limit that to just rows that match a WHERE clause using --where:
sqlite-utils convert content.db articles headline 'value.upper()' \
    --where "headline like '%cat%'"
You can include named parameters in your where clause and populate them using one or more --param options:
sqlite-utils convert content.db articles headline 'value.upper()' \
    --where "headline like :query" \
    --param query '%cat%'
The --dry-run option will output a preview of the conversion against the first ten rows, without modifying the database.
By default any rows with a falsey value for the column - such as 0 or null - will be skipped. Use the --no-skip-false option to disable this behaviour.
Importing additional modules#
You can specify Python modules that should be imported and made available to your code using one or more --import options. This example uses the textwrap module to wrap the content column at 100 characters:
sqlite-utils convert content.db articles content \
    '"\n".join(textwrap.wrap(value, 100))' \
    --import=textwrap
This supports nested imports as well, for example to use ElementTree:
sqlite-utils convert content.db articles content \
    'xml.etree.ElementTree.fromstring(value).attrib["title"]' \
    --import=xml.etree.ElementTree
Using the debugger#
If an error occurs while running your conversion operation you may see a message like this:
user-defined function raised exception
Add the --pdb option to catch the error and open the Python debugger at that point. The conversion operation will exit after you type q in the debugger.
Here’s an example debugging session. First, create a articles table with invalid XML in the content column:
echo '{"content": "This is not XML"}' | sqlite-utils insert content.db articles -
Now run the conversion with the --pdb option:
sqlite-utils convert content.db articles content \
    'xml.etree.ElementTree.fromstring(value).attrib["title"]' \
    --import=xml.etree.ElementTree \
    --pdb
When the error occurs the debugger will open:
Exception raised, dropping into pdb...: syntax error: line 1, column 0
> .../python3.11/xml/etree/ElementTree.py(1338)XML()
-> parser.feed(text)
(Pdb) args
text = 'This is not XML'
parser = <xml.etree.ElementTree.XMLParser object at 0x102c405e0>
(Pdb) q
args here shows the arguments to the current function in the stack. The Python pdb documentation has full details on the other available commands.
Defining a convert() function#
Instead of providing a single line of code to be executed against each value, you can define a function called convert(value).
This mechanism can be used to execute one-off initialization code that runs once at the start of the conversion run.
The following example adds a new score column, then updates it to list a random number - after first seeding the random number generator to ensure that multiple runs produce the same results:
sqlite-utils add-column content.db articles score float --not-null-default 1.0
sqlite-utils convert content.db articles score '
import random
random.seed(10)

def convert(value):
    return random.random()
'
sqlite-utils convert recipes#
Various built-in recipe functions are available for common operations. These are:
r.jsonsplit(value, delimiter=',', type=<class 'str'>)Convert a string like
a,b,cinto a JSON array["a", "b", "c"]The
delimiterparameter can be used to specify a different delimiter.The
typeparameter can be set tofloatorintto produce a JSON array of different types, for example if the column’s string value was1.2,3,4.5the following:r.jsonsplit(value, type=float)
Would produce an array like this:
[1.2, 3.0, 4.5]r.parsedate(value, dayfirst=False, yearfirst=False, errors=None)Parse a date and convert it to ISO date format:
yyyy-mm-ddIn the case of dates such as
03/04/05U.S.MM/DD/YYformat is assumed - you can usedayfirst=Trueoryearfirst=Trueto change how these ambiguous dates are interpreted.Use the
errors=parameter to specify what should happen if a value cannot be parsed.By default, if any value cannot be parsed an error will be occurred and all values will be left as they were.
Set
errors=r.IGNOREto ignore any values that cannot be parsed, leaving them unchanged.Set
errors=r.SET_NULLto set any values that cannot be parsed tonull.r.parsedatetime(value, dayfirst=False, yearfirst=False, errors=None)Parse a datetime and convert it to ISO datetime format:
yyyy-mm-ddTHH:MM:SS
These recipes can be used in the code passed to sqlite-utils convert like this:
sqlite-utils convert my.db mytable mycolumn \
  'r.jsonsplit(value)'
To use any of the documented parameters, do this:
sqlite-utils convert my.db mytable mycolumn \
  'r.jsonsplit(value, delimiter=":")'
Saving the result to a different column#
The --output and --output-type options can be used to save the result of the conversion to a separate column, which will be created if that column does not already exist:
sqlite-utils convert content.db articles headline 'value.upper()' \
  --output headline_upper
The type of the created column defaults to text, but a different column type can be specified using --output-type. This example will create a new floating point column called id_as_a_float with a copy of each item’s ID increased by 0.5:
sqlite-utils convert content.db articles id 'float(value) + 0.5' \
  --output id_as_a_float \
  --output-type float
You can drop the original column at the end of the operation by adding --drop.
Converting a column into multiple columns#
Sometimes you may wish to convert a single column into multiple derived columns. For example, you may have a location column containing latitude,longitude values which you wish to split out into separate latitude and longitude columns.
You can achieve this using the --multi option to sqlite-utils convert. This option expects your Python code to return a Python dictionary: new columns well be created and populated for each of the keys in that dictionary.
For the latitude,longitude example you would use the following:
sqlite-utils convert demo.db places location \
'bits = value.split(",")
return {
  "latitude": float(bits[0]),
  "longitude": float(bits[1]),
}' --multi
The type of the returned values will be taken into account when creating the new columns. In this example, the resulting database schema will look like this:
CREATE TABLE [places] (
    [location] TEXT,
    [latitude] FLOAT,
    [longitude] FLOAT
);
The code function can also return None, in which case its output will be ignored. You can drop the original column at the end of the operation by adding --drop.
Creating tables#
Most of the time creating tables by inserting example data is the quickest approach. If you need to create an empty table in advance of inserting data you can do so using the create-table command:
sqlite-utils create-table mydb.db mytable id integer name text --pk=id
This will create a table called mytable with two columns - an integer id column and a text name column. It will set the id column to be the primary key.
You can pass as many column-name column-type pairs as you like. Valid types are integer, text, float and blob.
You can specify columns that should be NOT NULL using --not-null colname. You can specify default values for columns using --default colname defaultvalue.
sqlite-utils create-table mydb.db mytable \
    id integer \
    name text \
    age integer \
    is_good integer \
    --not-null name \
    --not-null age \
    --default is_good 1 \
    --pk=id
sqlite-utils tables mydb.db --schema -t
table    schema
-------  --------------------------------
mytable  CREATE TABLE [mytable] (
            [id] INTEGER PRIMARY KEY,
            [name] TEXT NOT NULL,
            [age] INTEGER NOT NULL,
            [is_good] INTEGER DEFAULT '1'
        )
You can specify foreign key relationships between the tables you are creating using --fk colname othertable othercolumn:
sqlite-utils create-table books.db authors \
    id integer \
    name text \
    --pk=id

sqlite-utils create-table books.db books \
    id integer \
    title text \
    author_id integer \
    --pk=id \
    --fk author_id authors id
sqlite-utils tables books.db --schema -t
table    schema
-------  -------------------------------------------------
authors  CREATE TABLE [authors] (
            [id] INTEGER PRIMARY KEY,
            [name] TEXT
         )
books    CREATE TABLE [books] (
            [id] INTEGER PRIMARY KEY,
            [title] TEXT,
            [author_id] INTEGER REFERENCES [authors]([id])
         )
You can create a table in SQLite STRICT mode using --strict:
sqlite-utils create-table mydb.db mytable id integer name text --strict
sqlite-utils tables mydb.db --schema -t
table    schema
-------  ------------------------
mytable  CREATE TABLE [mytable] (
            [id] INTEGER,
            [name] TEXT
         ) STRICT
If a table with the same name already exists, you will get an error. You can choose to silently ignore this error with --ignore, or you can replace the existing table with a new, empty table using --replace.
You can also pass --transform to transform the existing table to match the new schema. See Explicitly creating a table in the Python library documentation for details of how this option works.
Renaming a table#
Yo ucan rename a table using the rename-table command:
sqlite-utils rename-table mydb.db oldname newname
Pass --ignore to ignore any errors caused by the table not existing, or the new name already being in use.
Duplicating tables#
The duplicate command duplicates a table - creating a new table with the same schema and a copy of all of the rows:
sqlite-utils duplicate books.db authors authors_copy
Dropping tables#
You can drop a table using the drop-table command:
sqlite-utils drop-table mydb.db mytable
Use --ignore to ignore the error if the table does not exist.
Transforming tables#
The transform command allows you to apply complex transformations to a table that cannot be implemented using a regular SQLite ALTER TABLE command. See Transforming a table for details of how this works. The transform command preserves a table’s STRICT mode.
sqlite-utils transform mydb.db mytable \
    --drop column1 \
    --rename column2 column_renamed
Every option for this table (with the exception of --pk-none) can be specified multiple times. The options are as follows:
--type column-name new-typeChange the type of the specified column. Valid types are
integer,text,float,blob.--drop column-nameDrop the specified column.
--rename column-name new-nameRename this column to a new name.
--column-order columnUse this multiple times to specify a new order for your columns.
-oshortcut is also available.--not-null column-nameSet this column as
NOT NULL.--not-null-false column-nameFor a column that is currently set as
NOT NULL, remove theNOT NULL.--pk column-nameChange the primary key column for this table. Pass
--pkmultiple times if you want to create a compound primary key.--pk-noneRemove the primary key from this table, turning it into a
rowidtable.--default column-name valueSet the default value of this column.
--default-none columnRemove the default value for this column.
--drop-foreign-key columnDrop the specified foreign key.
--add-foregn-key column other_table other_columnAdd a foreign key constraint to
columnpointing toother_table.other_column.
If you want to see the SQL that will be executed to make the change without actually executing it, add the --sql flag. For example:
sqlite-utils transform fixtures.db roadside_attractions \
    --rename pk id \
    --default name Untitled \
    --column-order id \
    --column-order longitude \
    --column-order latitude \
    --drop address \
    --sql
CREATE TABLE [roadside_attractions_new_4033a60276b9] (
   [id] INTEGER PRIMARY KEY,
   [longitude] FLOAT,
   [latitude] FLOAT,
   [name] TEXT DEFAULT 'Untitled'
);
INSERT INTO [roadside_attractions_new_4033a60276b9] ([longitude], [latitude], [id], [name])
   SELECT [longitude], [latitude], [pk], [name] FROM [roadside_attractions];
DROP TABLE [roadside_attractions];
ALTER TABLE [roadside_attractions_new_4033a60276b9] RENAME TO [roadside_attractions];
Adding a primary key to a rowid table#
SQLite tables that are created without an explicit primary key are created as rowid tables. They still have a numeric primary key which is available in the rowid column, but that column is not included in the output of select *. Here’s an example:
echo '[{"name": "Azi"}, {"name": "Suna"}]' | \
    sqlite-utils insert chickens.db chickens -
sqlite-utils schema chickens.db
CREATE TABLE [chickens] (
   [name] TEXT
);
sqlite-utils chickens.db 'select * from chickens'
[{"name": "Azi"},
 {"name": "Suna"}]
sqlite-utils chickens.db 'select rowid, * from chickens'
[{"rowid": 1, "name": "Azi"},
 {"rowid": 2, "name": "Suna"}]
You can use sqlite-utils transform ... --pk id to add a primary key column called id to the table. The primary key will be created as an INTEGER PRIMARY KEY and the existing rowid values will be copied across to it. It will automatically increment as new rows are added to the table:
sqlite-utils transform chickens.db chickens --pk id
sqlite-utils schema chickens.db
CREATE TABLE "chickens" (
   [id] INTEGER PRIMARY KEY,
   [name] TEXT
);
sqlite-utils chickens.db 'select * from chickens'
[{"id": 1, "name": "Azi"},
 {"id": 2, "name": "Suna"}]
echo '{"name": "Cardi"}' | sqlite-utils insert chickens.db chickens -
sqlite-utils chickens.db 'select * from chickens'
[{"id": 1, "name": "Azi"},
 {"id": 2, "name": "Suna"},
 {"id": 3, "name": "Cardi"}]
Extracting columns into a separate table#
The sqlite-utils extract command can be used to extract specified columns into a separate table.
Take a look at the Python API documentation for Extracting columns into a separate table for a detailed description of how this works, including examples of table schemas before and after running an extraction operation.
The command takes a database, table and one or more columns that should be extracted. To extract the species column from the trees table you would run:
sqlite-utils extract my.db trees species
This would produce the following schema:
CREATE TABLE "trees" (
    [id] INTEGER PRIMARY KEY,
    [TreeAddress] TEXT,
    [species_id] INTEGER,
    FOREIGN KEY(species_id) REFERENCES species(id)
);
CREATE TABLE [species] (
    [id] INTEGER PRIMARY KEY,
    [species] TEXT
);
CREATE UNIQUE INDEX [idx_species_species]
    ON [species] ([species]);
The command takes the following options:
--table TEXTThe name of the lookup to extract columns to. This defaults to using the name of the columns that are being extracted.
--fk-column TEXTThe name of the foreign key column to add to the table. Defaults to
columnname_id.--rename <TEXT TEXT>Use this option to rename the columns created in the new lookup table.
--silentDon’t display the progress bar.
Here’s a more complex example that makes use of these options. It converts this CSV file full of global power plants into SQLite, then extracts the country and country_long columns into a separate countries table:
wget 'https://github.com/wri/global-power-plant-database/blob/232a6666/output_database/global_power_plant_database.csv?raw=true'
sqlite-utils insert global.db power_plants \
    'global_power_plant_database.csv?raw=true' --csv
# Extract those columns:
sqlite-utils extract global.db power_plants country country_long \
    --table countries \
    --fk-column country_id \
    --rename country_long name
After running the above, the command sqlite-utils schema global.db reveals the following schema:
CREATE TABLE [countries] (
   [id] INTEGER PRIMARY KEY,
   [country] TEXT,
   [name] TEXT
);
CREATE TABLE "power_plants" (
   [country_id] INTEGER,
   [name] TEXT,
   [gppd_idnr] TEXT,
   [capacity_mw] TEXT,
   [latitude] TEXT,
   [longitude] TEXT,
   [primary_fuel] TEXT,
   [other_fuel1] TEXT,
   [other_fuel2] TEXT,
   [other_fuel3] TEXT,
   [commissioning_year] TEXT,
   [owner] TEXT,
   [source] TEXT,
   [url] TEXT,
   [geolocation_source] TEXT,
   [wepp_id] TEXT,
   [year_of_capacity_data] TEXT,
   [generation_gwh_2013] TEXT,
   [generation_gwh_2014] TEXT,
   [generation_gwh_2015] TEXT,
   [generation_gwh_2016] TEXT,
   [generation_gwh_2017] TEXT,
   [generation_data_source] TEXT,
   [estimated_generation_gwh] TEXT,
   FOREIGN KEY([country_id]) REFERENCES [countries]([id])
);
CREATE UNIQUE INDEX [idx_countries_country_name]
    ON [countries] ([country], [name]);
Creating views#
You can create a view using the create-view command:
sqlite-utils create-view mydb.db version "select sqlite_version()"
sqlite-utils mydb.db "select * from version"
[{"sqlite_version()": "3.31.1"}]
Use --replace to replace an existing view of the same name, and --ignore to do nothing if a view already exists.
Dropping views#
You can drop a view using the drop-view command:
sqlite-utils drop-view myview
Use --ignore to ignore the error if the view does not exist.
Adding columns#
You can add a column using the add-column command:
sqlite-utils add-column mydb.db mytable nameofcolumn text
The last argument here is the type of the column to be created. This can be one of:
textorstrintegerorintfloatbloborbytes
This argument is optional and defaults to text.
You can add a column that is a foreign key reference to another table using the --fk option:
sqlite-utils add-column mydb.db dogs species_id --fk species
This will automatically detect the name of the primary key on the species table and use that (and its type) for the new column.
You can explicitly specify the column you wish to reference using --fk-col:
sqlite-utils add-column mydb.db dogs species_id --fk species --fk-col ref
You can set a NOT NULL DEFAULT 'x' constraint on the new column using --not-null-default:
sqlite-utils add-column mydb.db dogs friends_count integer --not-null-default 0
Adding columns automatically on insert/update#
You can use the --alter option to automatically add new columns if the data you are inserting or upserting is of a different shape:
sqlite-utils insert dogs.db dogs new-dogs.json --pk=id --alter
Adding foreign key constraints#
The add-foreign-key command can be used to add new foreign key references to an existing table - something which SQLite’s ALTER TABLE command does not support.
To add a foreign key constraint pointing the books.author_id column to authors.id in another table, do this:
sqlite-utils add-foreign-key books.db books author_id authors id
If you omit the other table and other column references sqlite-utils will attempt to guess them - so the above example could instead look like this:
sqlite-utils add-foreign-key books.db books author_id
Add --ignore to ignore an existing foreign key (as opposed to returning an error):
sqlite-utils add-foreign-key books.db books author_id --ignore
See Adding foreign key constraints in the Python API documentation for further details, including how the automatic table guessing mechanism works.
Adding multiple foreign keys at once#
Adding a foreign key requires a VACUUM. On large databases this can be an expensive operation, so if you are adding multiple foreign keys you can combine them into one operation (and hence one VACUUM) using add-foreign-keys:
sqlite-utils add-foreign-keys books.db \
    books author_id authors id \
    authors country_id countries id
When you are using this command each foreign key needs to be defined in full, as four arguments - the table, column, other table and other column.
Adding indexes for all foreign keys#
If you want to ensure that every foreign key column in your database has a corresponding index, you can do so like this:
sqlite-utils index-foreign-keys books.db
Setting defaults and not null constraints#
You can use the --not-null and --default options (to both insert and upsert) to specify columns that should be NOT NULL or to set database defaults for one or more specific columns:
sqlite-utils insert dogs.db dogs_with_scores dogs-with-scores.json \
    --not-null=age \
    --not-null=name \
    --default age 2 \
    --default score 5
Creating indexes#
You can add an index to an existing table using the create-index command:
sqlite-utils create-index mydb.db mytable col1 [col2...]
This can be used to create indexes against a single column or multiple columns.
The name of the index will be automatically derived from the table and columns. To specify a different name, use --name=name_of_index.
Use the --unique option to create a unique index.
Use --if-not-exists to avoid attempting to create the index if one with that name already exists.
To add an index on a column in descending order, prefix the column with a hyphen. Since this can be confused for a command-line option you need to construct that like this:
sqlite-utils create-index mydb.db mytable -- col1 -col2 col3
This will create an index on that table on (col1, col2 desc, col3).
If your column names are already prefixed with a hyphen you’ll need to manually execute a CREATE INDEX SQL statement to add indexes to them rather than using this tool.
Add the --analyze option to run ANALYZE against the index after it has been created.
Configuring full-text search#
You can enable SQLite full-text search on a table and a set of columns like this:
sqlite-utils enable-fts mydb.db documents title summary
This will use SQLite’s FTS5 module by default. Use --fts4 if you want to use FTS4:
sqlite-utils enable-fts mydb.db documents title summary --fts4
The enable-fts command will populate the new index with all existing documents. If you later add more documents you will need to use populate-fts to cause them to be indexed as well:
sqlite-utils populate-fts mydb.db documents title summary
A better solution here is to use database triggers. You can set up database triggers to automatically update the full-text index using the --create-triggers option when you first run enable-fts:
sqlite-utils enable-fts mydb.db documents title summary --create-triggers
To set a custom FTS tokenizer, e.g. to enable Porter stemming, use --tokenize=:
sqlite-utils populate-fts mydb.db documents title summary --tokenize=porter
To remove the FTS tables and triggers you created, use disable-fts:
sqlite-utils disable-fts mydb.db documents
To rebuild one or more FTS tables (see Rebuilding a full-text search table), use rebuild-fts:
sqlite-utils rebuild-fts mydb.db documents
You can rebuild every FTS table by running rebuild-fts without passing any table names:
sqlite-utils rebuild-fts mydb.db
Executing searches#
Once you have configured full-text search for a table, you can search it using sqlite-utils search:
sqlite-utils search mydb.db documents searchterm
This command accepts the same output options as sqlite-utils query: --table, --csv, --tsv, --nl etc.
By default it shows the most relevant matches first. You can specify a different sort order using the -o option, which can take a column or a column followed by desc:
# Sort by rowid
sqlite-utils search mydb.db documents searchterm -o rowid
# Sort by created in descending order
sqlite-utils search mydb.db documents searchterm -o 'created desc'
SQLite advanced search syntax is enabled by default. To run a search with automatic quoting applied to the terms to avoid them being potentially interpreted as advanced search syntax use the --quote option.
You can specify a subset of columns to be returned using the -c option one or more times:
sqlite-utils search mydb.db documents searchterm -c title -c created
By default all search results will be returned. You can use --limit 20 to return just the first 20 results.
Use the --sql option to output the SQL that would be executed, rather than running the query:
sqlite-utils search mydb.db documents searchterm --sql
with original as (
    select
        rowid,
        *
    from [documents]
)
select
    [original].*
from
    [original]
    join [documents_fts] on [original].rowid = [documents_fts].rowid
where
    [documents_fts] match :query
order by
    [documents_fts].rank
Enabling cached counts#
select count(*) queries can take a long time against large tables. sqlite-utils can speed these up by adding triggers to maintain a _counts table, see Cached table counts using triggers for details.
The sqlite-utils enable-counts command can be used to configure these triggers, either for every table in the database or for specific tables.
# Configure triggers for every table in the database
sqlite-utils enable-counts mydb.db

# Configure triggers just for specific tables
sqlite-utils enable-counts mydb.db table1 table2
If the _counts table ever becomes out-of-sync with the actual table counts you can repair it using the reset-counts command:
sqlite-utils reset-counts mydb.db
Optimizing index usage with ANALYZE#
The SQLite ANALYZE command builds a table of statistics which the query planner can use to make better decisions about which indexes to use for a given query.
You should run ANALYZE if your database is large and you do not think your indexes are being efficiently used.
To run ANALYZE against every index in a database, use this:
sqlite-utils analyze mydb.db
You can run it against specific tables, or against specific named indexes, by passing them as optional arguments:
sqlite-utils analyze mydb.db mytable idx_mytable_name
You can also run ANALYZE as part of another command using the --analyze option. This is supported by the create-index, insert and upsert commands.
Vacuum#
You can run VACUUM to optimize your database like so:
sqlite-utils vacuum mydb.db
Optimize#
The optimize command can dramatically reduce the size of your database if you are using SQLite full-text search. It runs OPTIMIZE against all of your FTS4 and FTS5 tables, then runs VACUUM.
If you just want to run OPTIMIZE without the VACUUM, use the --no-vacuum flag.
# Optimize all FTS tables and then VACUUM
sqlite-utils optimize mydb.db

# Optimize but skip the VACUUM
sqlite-utils optimize --no-vacuum mydb.db
To optimize specific tables rather than every FTS table, pass those tables as extra arguments:
sqlite-utils optimize mydb.db table_1 table_2
WAL mode#
You can enable Write-Ahead Logging for a database file using the enable-wal command:
sqlite-utils enable-wal mydb.db
You can disable WAL mode using disable-wal:
sqlite-utils disable-wal mydb.db
Both of these commands accept one or more database files as arguments.
Dumping the database to SQL#
The dump command outputs a SQL dump of the schema and full contents of the specified database file:
sqlite-utils dump mydb.db
BEGIN TRANSACTION;
CREATE TABLE ...
...
COMMIT;
Loading SQLite extensions#
Many of these commands have the ability to load additional SQLite extensions using the --load-extension=/path/to/extension option - use --help to check for support, e.g. sqlite-utils rows --help.
This option can be applied multiple times to load multiple extensions.
Since SpatiaLite is commonly used with SQLite, the value spatialite is special: it will search for SpatiaLite in the most common installation locations, saving you from needing to remember exactly where that module is located:
sqlite-utils memory "select spatialite_version()" --load-extension=spatialite
[{"spatialite_version()": "4.3.0a"}]
SpatiaLite helpers#
SpatiaLite adds geographic capability to SQLite (similar to how PostGIS builds on PostgreSQL). The SpatiaLite cookbook is a good resource for learning what’s possible with it.
You can convert an existing table to a geographic table by adding a geometry column, use the sqlite-utils add-geometry-column command:
sqlite-utils add-geometry-column spatial.db locations geometry --type POLYGON --srid 4326
The table (locations in the example above) must already exist before adding a geometry column. Use sqlite-utils create-table first, then add-geometry-column.
Use the --type option to specify a geometry type. By default, add-geometry-column uses a generic GEOMETRY, which will work with any type, though it may not be supported by some desktop GIS applications.
Eight (case-insensitive) types are allowed:
POINT
LINESTRING
POLYGON
MULTIPOINT
MULTILINESTRING
MULTIPOLYGON
GEOMETRYCOLLECTION
GEOMETRY
Adding spatial indexes#
Once you have a geometry column, you can speed up bounding box queries by adding a spatial index:
sqlite-utils create-spatial-index spatial.db locations geometry
See this SpatiaLite Cookbook recipe for examples of how to use a spatial index.
Installing packages#
The convert command and the insert –convert and query –functions options can be provided with a Python script that imports additional modules from the sqlite-utils environment.
You can install packages from PyPI directly into the correct environment using sqlite-utils install <package>. This is a wrapper around pip install.
sqlite-utils install beautifulsoup4
Use -U to upgrade an existing package.
Uninstalling packages#
You can uninstall packages that were installed using sqlite-utils install with sqlite-utils uninstall <package>:
sqlite-utils uninstall beautifulsoup4
Use -y to skip the request for confirmation.
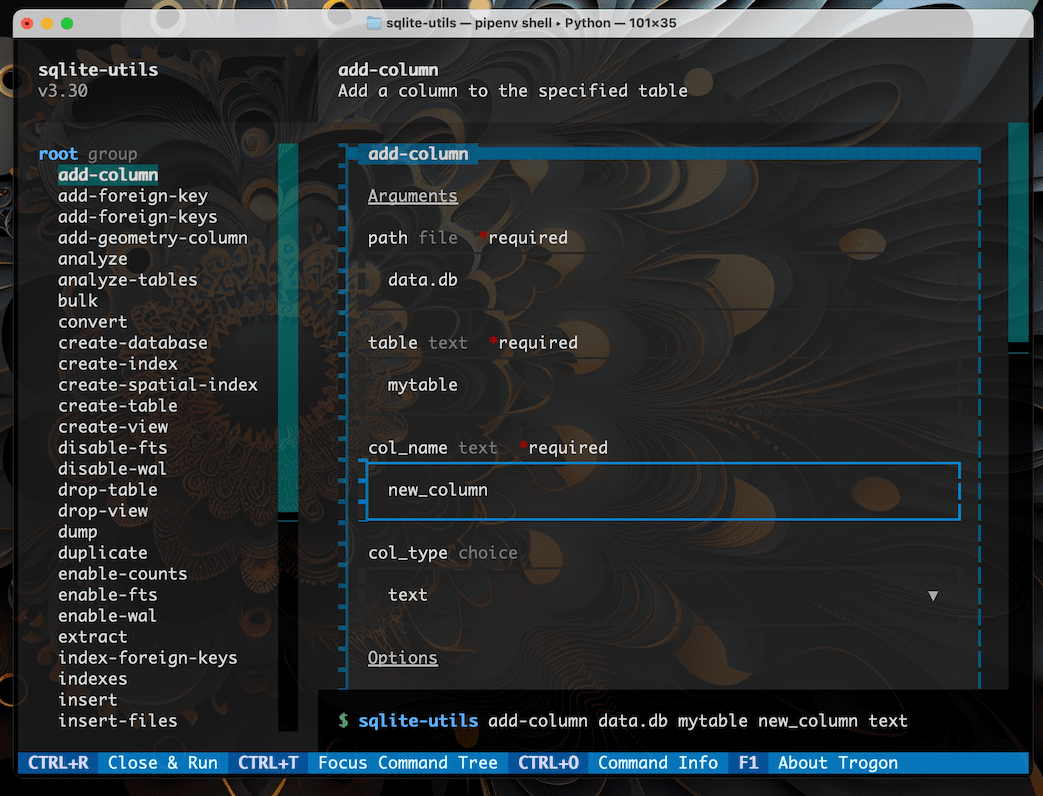
Experimental TUI#
A TUI is a “text user interface” (or “terminal user interface”) - a keyboard and mouse driven graphical interface running in your terminal.
sqlite-utils has experimental support for a TUI for building command-line invocations, built on top of the Trogon TUI library.
To enable this feature you will need to install the trogon dependency. You can do that like so:
sqite-utils install trogon
Once installed, running the sqlite-utils tui command will launch the TUI interface:
sqlite-utils tui
You can then construct a command by selecting options from the menus, and execute it using Ctrl+R.